
TL;DR:
- Hydraulic failures on Greek farm tractors disrupt operations but can often be diagnosed and repaired by operators using proper tools and procedures. Proper preparation, safety precautions, and systematic troubleshooting help ensure efficient repairs and prevent further damage. Routine maintenance and accurate part identification extend hydraulic system lifespan and reduce unplanned downtime.
A hydraulic failure at the wrong moment can shut down your entire operation. In Greece’s demanding agricultural seasons, where olive harvests, grain cutting, and vineyard work run on tight schedules, a tractor that won’t lift, steer, or drive puts real money at risk. The good news is that most hydraulic problems on farm machinery follow predictable patterns, and with the right tools, parts, and a clear process, you can diagnose and fix them yourself without waiting days for a technician. This guide walks you through every stage of hydraulic repair, from preparation to final pressure checks, so you can get back to work faster.
Table of Contents
- What you need before starting hydraulic repair
- Step-by-step hydraulic repair instructions
- Common mistakes and troubleshooting tips
- Verifying your repair and maintaining hydraulic systems
- Expert perspective: Hydraulic repair shortcuts and realities
- Get expert help and parts for hydraulic repairs
- Frequently asked questions
Key Takeaways
| Point | Details |
|---|---|
| Preparation is critical | Having the right tools and safety gear ensures efficient hydraulic repair and minimizes risk. |
| Follow clear steps | A structured repair process reduces mistakes and increases the likelihood of successful fixes. |
| Avoid common errors | Recognizing mistakes like improper diagnosis or fluid selection can prevent recurring hydraulic issues. |
| Verify and maintain | Testing your repairs and committing to regular maintenance will extend machinery lifespan and performance. |
What you need before starting hydraulic repair
With an understanding of why repairs matter, let’s lay out the essentials needed before you even begin the job.
Jumping straight into a hydraulic repair without the right setup is one of the fastest ways to make a problem worse. Contamination, wrong parts, or missing tools mid-job create delays that cost more time than the original fault. A few minutes of preparation make the actual repair faster and safer.
Basic and specialized tools you need
| Tool | Purpose |
|---|---|
| Hydraulic pressure gauge (0-250 bar) | Measure system pressure before and after repair |
| Seal puller and installer set | Remove and fit O-rings and lip seals without damage |
| Adjustable torque wrench | Tighten fittings to exact specification |
| Flushing pump or hand pump | Clear contaminated fluid from lines |
| Drain pans (at least 10L capacity) | Collect old fluid safely |
| Bright work light or headlamp | Inspect dark areas under housings |
| Digital calipers | Measure seal and bore diameters precisely |
| Thread repair kit | Fix damaged ports on pumps or valves |
Spare parts to have on hand by tractor category
The parts you need depend on your machine. For older Greek fleet workhorses like John Deere 6000 series, Kubota M series, and SAME tractors, here is what to stock before you start:
- Seal and O-ring kit matched to your pump model number
- Hydraulic pump shaft seal
- Control valve spool seals
- High-pressure hydraulic hoses (two spare lengths)
- Hydraulic filter element
- Correct grade hydraulic fluid (10L minimum)
The tractor hydraulic repair guide covers the detailed process for repairing hydraulic systems used in farm equipment such as tractors and harvesters, and it lists common part numbers by machine type so you order the right items first time.
Safety gear you must not skip
Hydraulic fluid under pressure can cause serious injection injuries. Even after depressurizing, residual pressure in accumulators and long hose runs can remain dangerous for several minutes.
- Safety glasses with side shields
- Nitrile gloves rated for hydraulic fluid
- Steel-toe boots
- Fire-resistant overalls (hydraulic fluid is flammable)
- First aid kit within reach of your workspace
Pro Tip: Lay out all tools and parts on a clean tarp before you start. Label removed components with masking tape and a marker as you disassemble. This 5-minute habit saves 30 minutes of reassembly confusion, especially for complex multi-valve systems.
Step-by-step hydraulic repair instructions
Now that your tools, parts, and workspace are ready, here’s the step-by-step process for hydraulic repair.
1. Safely depressurize the system
Park the tractor on flat ground and engage the parking brake. Lower all implements to the ground so no weight sits on the hydraulic circuit. Turn off the engine and wait at least 5 minutes. Then cycle the hydraulic control levers back and forth several times with the engine off to release residual pressure from the lines and accumulators.
2. Diagnose the failure
Before removing anything, identify the exact failure type. This saves you from replacing parts that are still working.
| Symptom | Most likely cause | Diagnostic check |
|---|---|---|
| Slow or weak cylinder movement | Low system pressure or pump wear | Test pressure at pump outlet port |
| Fluid leaking externally | Failed seals, cracked hose, loose fitting | Visual inspection under operating load |
| No movement on one circuit | Stuck spool valve or blocked filter | Test other circuits to isolate |
| Noisy pump (whining or knocking) | Cavitation or internal pump damage | Check fluid level and filter condition first |
| System heats up abnormally fast | Relief valve stuck open or wrong fluid | Check relief valve setting and fluid grade |
3. Remove and inspect hydraulic components
Drain the reservoir into your drain pan before removing any lines. Cap all open ports immediately with clean plastic caps to prevent dirt entry. Even a small amount of grit entering the system will damage precision pump bores within hours of operation.
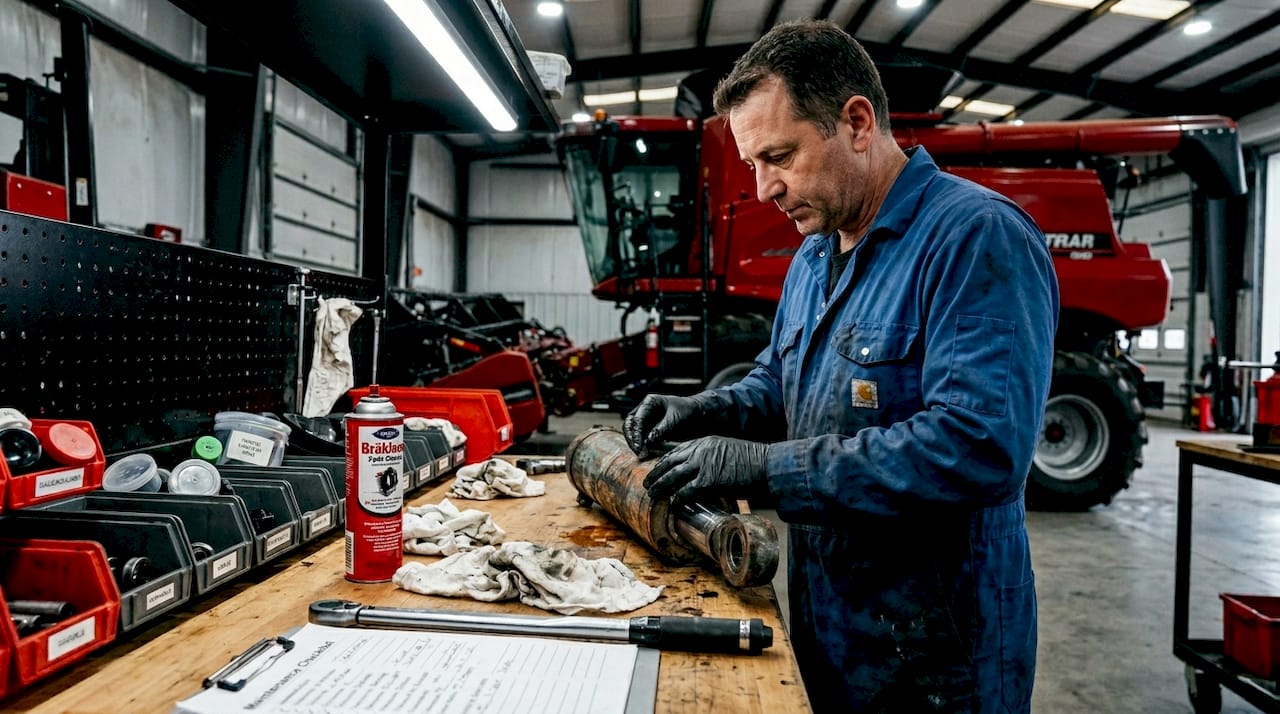
Remove the suspect component, whether it is a pump, control valve, or cylinder. Clean the exterior with parts cleaner before opening it. Inspect all seals, bores, and spool surfaces for wear, scoring, or swelling caused by incompatible fluid.
4. Replace faulty parts or seals
Match every seal to the exact part number from your service manual or measure with digital calipers. A seal that is 0.5mm too large will roll and fail within 10 hours. Lightly coat new seals with clean hydraulic fluid before installation and use the correct installer tool to avoid nicking the sealing lip.
For pumps showing internal wear on gears or pistons, replacement is more reliable than attempting to refinish surfaces in the field.
5. Reassemble and refill hydraulic fluid
Reassemble in reverse order of disassembly, torquing all fittings to the manufacturer’s specification with your torque wrench. Never use thread sealant on hydraulic fittings unless specified. Refill with the correct grade of fluid and replace the hydraulic filter at the same time.
Safety warning: Never start the engine to test the system without checking that all fittings are fully tightened and all drain plugs are replaced. A pressurized open port can inject fluid at over 200 bar, causing serious or fatal injury.
The step by step tractor repair guide provides additional visual references and torque specifications for the most common tractor models operated across Greek farms.
Pro Tip: After refilling fluid, run the engine at idle for 5 minutes with implements in neutral before applying any load. This bleeds air from the lines gradually and prevents pump cavitation damage during the critical first startup.
Common mistakes and troubleshooting tips
After completing the repair steps, it’s important to avoid common errors and know how to handle unexpected issues.
Even experienced operators make avoidable mistakes during hydraulic repairs. Knowing what typically goes wrong helps you catch problems before they become expensive.
The four most damaging mistakes
Incorrect diagnosis leading to wrong part replacement. Many farmers replace the pump when the actual fault is a blocked filter or a stuck relief valve. Always test system pressure at the pump outlet first. If pressure is correct at the pump but drops at the cylinder, the fault is downstream, not in the pump itself.
Insufficient cleaning before reassembly. Hydraulic systems operate with clearances as tight as 5 microns in some pump designs. One piece of grit from an unclean workbench can destroy a rebuilt pump within hours. Use clean lint-free rags and fresh parts cleaner on every surface before assembly.
Improper fluid selection. Using engine oil or the wrong viscosity hydraulic fluid is surprisingly common on Greek farms, especially when the correct fluid runs out mid-season. Wrong fluid causes seal swelling, incorrect viscosity causes pump cavitation, and some fluids attack rubber seals directly. Always check your operator manual for the correct ISO grade.
Over-tightening fittings. Hydraulic fittings are designed to seal through precision metal-to-metal contact or through O-ring compression, not through brute force. Over-tightening cracks housings, distorts seat faces, and strips threads, turning a simple seal replacement into an expensive housing repair.
Common symptoms and quick fixes
- Fluid weeping from hose crimps: Replace the hose assembly. Crimped hose ends cannot be re-sealed reliably once they weep.
- Spongy or inconsistent cylinder movement: Air in the system. Bleed by cycling the cylinder slowly from full extension to full retraction 10 times with engine at idle.
- Relief valve chattering noise: Contamination on the valve seat. Remove, clean, and inspect the poppet and seat for scoring.
- Pump running hot after replacement: Check fluid level and filter. A starved pump heats up within minutes.
- Seals failing repeatedly in the same location: Wrong seal material for your fluid type, or a scored bore that needs refinishing or sleeving.
The best long-term strategy is building a strong foundation through routine checks for farm machinery, because preventive strategies extend the life of hydraulic systems significantly in agricultural environments. For more complex failures, the agricultural equipment troubleshooting resource covers a wide range of scenario-specific solutions.
Remember: Before closing up any repaired hydraulic assembly, physically run your finger around every seal groove and confirm each seal is seated flat and fully into its groove. A seal that is twisted or partially out of its groove will fail under pressure within the first hour of operation.
Pro Tip: Mix a small amount of UV dye (available at most tractor supply stores) into your hydraulic fluid after repair. If a leak develops, a UV flashlight will pinpoint the exact source in seconds, even on a dirty, oil-covered component.
Verifying your repair and maintaining hydraulic systems
Once your repair is complete, proper verification and ongoing maintenance will ensure optimal performance and prevent downtime.
Completing the physical repair is only part of the job. Verifying that the system performs correctly under real load conditions, and building a maintenance routine, is what separates a repair that lasts from one that fails again in two weeks.
Start-up checklist after repair
Before applying any working load, run through this sequence:
- Check fluid level in reservoir (should be at the full mark)
- Inspect all external connections for immediate seepage
- Start engine and run at idle for 5 minutes
- Slowly operate each hydraulic circuit through its full range of motion
- Check pressure with gauge at test port (compare to specification in your manual)
- Operate under partial load for 10 minutes, then inspect again
- Allow system to reach operating temperature, then recheck all fittings
Monitor hydraulic performance and pressure
A repaired system should reach rated pressure within the first cycle of operation. If pressure is low, recheck the relief valve setting and confirm the correct fluid was used. Sluggish response that improves as the system warms up usually points to fluid that is too thick for current ambient temperatures, a common issue in colder Greek winters in northern regions like Kavala and the Macedonian plains.
Routine maintenance best practices
According to hydraulic maintenance tips, best practices for routine maintenance and preventive care of hydraulic systems on farms show that consistent maintenance schedules can extend system lifespan significantly. Here are the habits that make the biggest difference:
- Change hydraulic fluid every 500 to 1,000 hours of operation or annually
- Replace hydraulic filter every 250 hours or at every fluid change
- Inspect all hoses and fittings for cracks, abrasion, or weeping at the start of each season
- Keep the reservoir breather cap clean to prevent vacuum contamination
- Test fluid viscosity and contamination level with a portable oil analysis kit once per season
- Follow the full schedule outlined in the preventative maintenance guide to stay ahead of failures
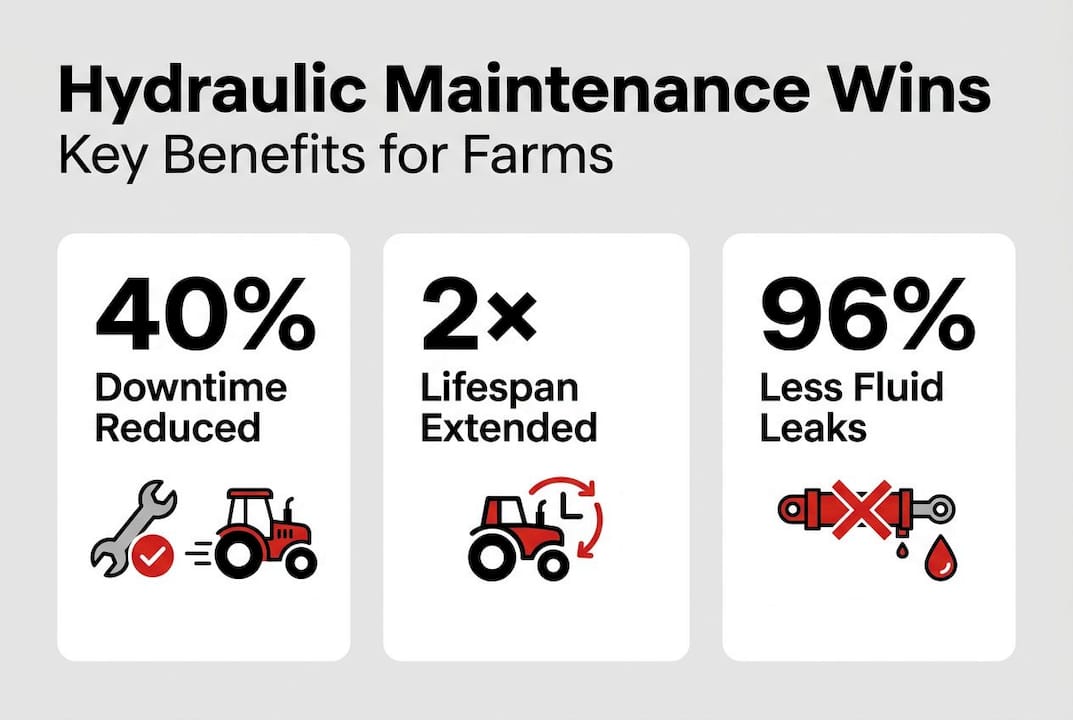
Statistic callout: Industry data consistently shows that tractors and harvesters on regular hydraulic maintenance schedules experience up to 50% fewer unplanned breakdowns and can double the working lifespan of hydraulic components compared to machines that receive only reactive repairs.
Expert perspective: Hydraulic repair shortcuts and realities
Let’s be direct about something that most repair guides won’t tell you: the majority of hydraulic failures on Greek farm tractors are found at the diagnostic stage, not during parts replacement. Operators spend hours rebuilding pumps when a 10-minute pressure test would have pointed directly to a clogged filter or a misadjusted relief valve. Simple, systematic diagnostics consistently save more time than any physical repair shortcut.
Here’s a practical shortcut that actually works: modular valve replacement. Many modern tractor hydraulic systems use stackable control valve sections. When one section fails, you don’t need to rebuild the entire valve block. Order the specific section, swap it out, and you’re back to work in under an hour. This approach is faster, cleaner, and more reliable than attempting to lap spool valves in the field.
The reality check most farmers need is this: not every leak requires a full system teardown. A weeping cylinder rod seal can often be replaced with the cylinder still on the tractor. A seeping pump shaft seal can frequently be changed without removing the pump from the engine housing. Learn to distinguish between a minor seal job and a full component failure before you commit to major disassembly.
For anyone handling multiple machines through a season, the advance hydraulic repair tips in the full repair guide provide machine-specific shortcuts that reduce average repair time considerably.
Pro Tip: Keep a small notebook in your tractor cab. Log every repair, the date, the hours on the machine, and what parts you used. After two seasons, patterns emerge clearly. You’ll know exactly which components to inspect first on your specific machines, turning guesswork into a reliable, predictable maintenance system.
Get expert help and parts for hydraulic repairs
If you need additional support or genuine parts, here’s how you can access trusted resources and expert help.
At pexlivanidis.com, we stock over 20,000 agricultural machinery parts including seal kits, hydraulic filters, pumps, hoses, and control valves for the most popular tractor models operating across Greece. Orders over 100 euros ship free within Greece, and our B2B wholesale membership is available for operators managing multiple machines or cooperative fleets. The full maintenance tips guide and the peak performance guide are available on our blog to support every stage of your repair and maintenance work. Contact our team in Thessaloniki or Kavala for part availability, technical advice, and fast delivery across northern Greece and beyond.
Frequently asked questions
Which hydraulic fluid should I use for my tractor in Greece?
Always use the fluid specified by your tractor manufacturer, and confirm it suits local climate conditions, since winters in northern Greece can require a lower-viscosity grade to maintain cold-start performance.
How often should hydraulic systems be checked on farm machinery?
Routine hydraulic checks should be performed every 50 to 100 hours of operation or at least once per season, as preventive strategies for agricultural hydraulic systems emphasize consistent inspection intervals.
What are the signs that a hydraulic system needs repair?
Common symptoms include slow or weak cylinder response, visible leaks, loss of pressure, unusual pump noises, or excessive system heat, all of which the tractor hydraulic repair guide covers in detail for farm equipment diagnosis.
Can I repair hydraulic systems myself or do I need a professional?
Simple seal replacements, filter changes, and hose swaps can be handled confidently by following a detailed repair process, but complex internal pump failures or valve block damage typically require professional equipment and expertise.