
TL;DR:
- Regular brake inspections are essential to prevent accidents and ensure safety during demanding terrain operation. Proper setup, understanding brake types, and systematic checks help identify wear, leaks, or misadjustments early. Incorporating routine maintenance into your schedule and seeking professional help when needed significantly improves your tractor’s safety and longevity.
Imagine you’re heading downhill on a terraced Greek hillside, loaded trailer behind you, and you press the brake pedal. It sinks too far. One side grabs harder than the other. The tractor pulls sharply left. That split second of panic is exactly what a proper brake inspection prevents. For farmers and tractor operators working through long seasons in demanding terrain, reliable brakes aren’t optional. They are the difference between a productive day and a tragedy. This guide walks you through the full process, from tool prep to final checks, so you can keep your tractor performing safely every time you take it into the field or onto the road.
Table of Contents
- Gathering the right tools and safety equipment
- Understanding your tractor’s brake types and common issues
- Step-by-step process: Inspecting tractor brake systems
- Troubleshooting, maintenance intervals, and when to call a professional
- Why quick brake checks aren’t enough: Lessons from the field
- Upgrade your farm’s safety and efficiency with expert maintenance resources
- Frequently asked questions
Key Takeaways
| Point | Details |
|---|---|
| Safety starts with inspection | Regular brake inspections prevent accidents and ensure reliable tractor operation. |
| Know your brake type | Identify whether your brakes are dry disc, wet disc, or drum to follow the correct inspection steps. |
| Address issues early | Noticing squeaks, leaks, or pedal variance means repairs or adjustments are needed without delay. |
| Interval matters | Check brakes before daily use and thoroughly every 50–500 hours for optimal performance. |
| Professional help for complex systems | Seek a mechanic for wet/hydraulic brakes or if you suspect internal faults beyond simple adjustments. |
Gathering the right tools and safety equipment
Now that you know why regular inspection is critical, let’s get started by making sure you have the right tools and equipment.
Before you touch any component, you need the right setup. Inspecting tractor brakes without proper preparation leads to incomplete results at best and injury at worst. Taking twenty minutes to organize your workspace saves hours of frustration and keeps you safe throughout the process.
Here is what you need:
| Tool or item | Purpose |
|---|---|
| Combination wrenches (metric and imperial) | Adjusting brake linkage and turnbuckles |
| Flathead and Phillips screwdrivers | Removing cover plates and inspection panels |
| Flashlight or work light | Illuminating dark brake cavities |
| Floor jack and jack stands | Safely lifting the tractor for wheel inspection |
| Brake fluid tester | Checking hydraulic fluid condition |
| Ruler or caliper | Measuring pedal travel and lining thickness |
| Mechanic’s gloves | Hand protection from sharp edges and fluids |
| Safety glasses | Eye protection from debris and fluid splashes |
| Drain pan | Catching fluid during wet disc inspection |
| Clean rags | Wiping surfaces and identifying leaks |
Personal protective equipment (PPE) is non-negotiable. Wear gloves and safety glasses throughout. Brake dust from older tractors can contain harmful particles, and hydraulic fluid is an irritant that can cause skin and eye damage with repeated exposure.
Before you begin, place the tractor on firm, level ground. Engage the parking brake, chock the wheels, and turn off the engine. Let the engine and exhaust cool completely before reaching into any enclosed space. Always disconnect the battery if there is any risk of accidental startup. These are not formalities. A tractor that shifts unexpectedly can cause life-altering injury.
For a complete starting point, preparing your tractor before each season sets the foundation for every safety check that follows.
Pre-operational checks for tractors recommend including brakes in your daily pre-operational review, covering fluid leaks, pedal feel, and greasing brake pedal pivot points every 50 operating hours. Most operators skip the greasing step entirely, and then wonder why pedal movement becomes stiff and inconsistent.
Pro Tip: Set up your inspection workspace in a covered area with good lighting. A flashlight pointed at the wrong angle misses cracks and fluid stains that would be obvious in direct overhead light. Keep a notepad nearby to record what you find during each section of the inspection.
“A messy, unlit workspace is how small problems become big ones. Take five minutes to set up properly and you will spot things you would otherwise miss entirely.”
Understanding your tractor’s brake types and common issues
Once you’re set up, it’s critical to know what you’re looking at. Here’s how to identify your brake type and understand the most common problems.
Not all tractor brakes work the same way, and inspecting them incorrectly based on the wrong assumptions leads to missed damage and false confidence. There are three main types you will encounter on tractors operating in Greece today.
Dry disc brakes use friction pads pressing against a disc that is exposed to air. They are the most straightforward to inspect visually and are well suited to DIY maintenance on smaller and mid-range tractors.
Wet disc brakes operate submerged in an oil bath inside the axle housing. They offer excellent braking consistency in tough field conditions but are significantly harder to inspect. Opening the housing to check internal components typically requires draining oil and specialized tools.
Drum brakes use curved brake shoes that press outward against the inside of a drum. Older tractors commonly use this design. They work well but tend to collect dust and debris, and the internal components are hidden until you remove the drum.
Tractor brakes by type include dry disc, wet disc, and drum variations. During inspection, check drums and rotors for cracks, grooves, and overheating signs such as a blue tint on metal surfaces. A blue tint means the metal has been stressed by excessive heat, which weakens it even if it looks otherwise intact.
| Brake type | DIY-friendly | Inspection access | Key maintenance need |
|---|---|---|---|
| Dry disc | Yes | Easy, visual | Check pad thickness, disc condition |
| Wet disc | No | Difficult, requires oil drain | Oil level and condition, seals |
| Drum | Moderate | Medium, remove drum | Shoe thickness, springs, cylinder |
Common warning signs across all brake types include:
- Squealing or grinding during braking (worn pads or shoes)
- The tractor pulling left or right when braking (uneven pad wear or adjustment)
- Brake fade under heavy use (overheated or contaminated discs)
- Visible fluid leaks near wheels or brake housings
- Spongy or soft pedal feel (air in hydraulic lines)
- A stiff pedal that requires excessive force (seized linkage or caliper)
For a broader picture of what can go wrong and how repairs are approached, reviewing common repair methods helps you understand what you might be dealing with before you start tearing things apart.
Pro Tip: Press each brake pedal separately while stationary. If one side feels significantly different from the other in terms of resistance or travel depth, that asymmetry is a strong indicator of uneven wear or a linkage problem. This simple test costs you thirty seconds and tells you a lot.
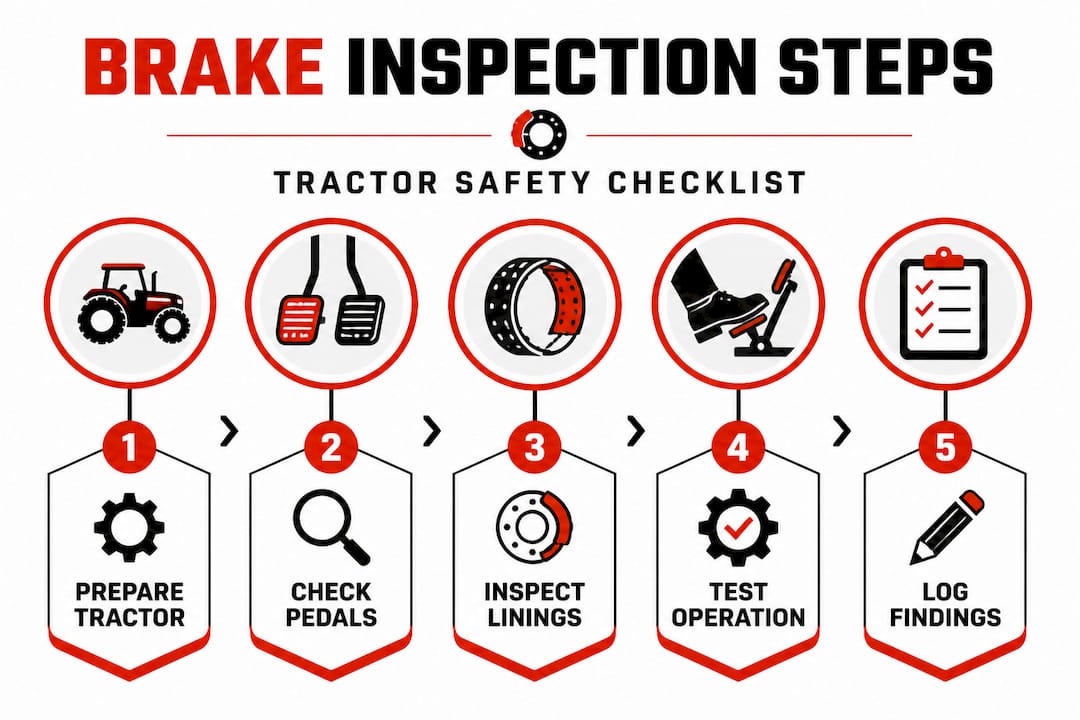
Step-by-step process: Inspecting tractor brake systems
Knowing your brake system’s design and warning signs, it’s time to put that knowledge to use in a hands-on inspection.
Follow these steps in order. Skipping steps or jumping ahead based on what you think the problem is leads to missed issues. Work through the sequence every time.
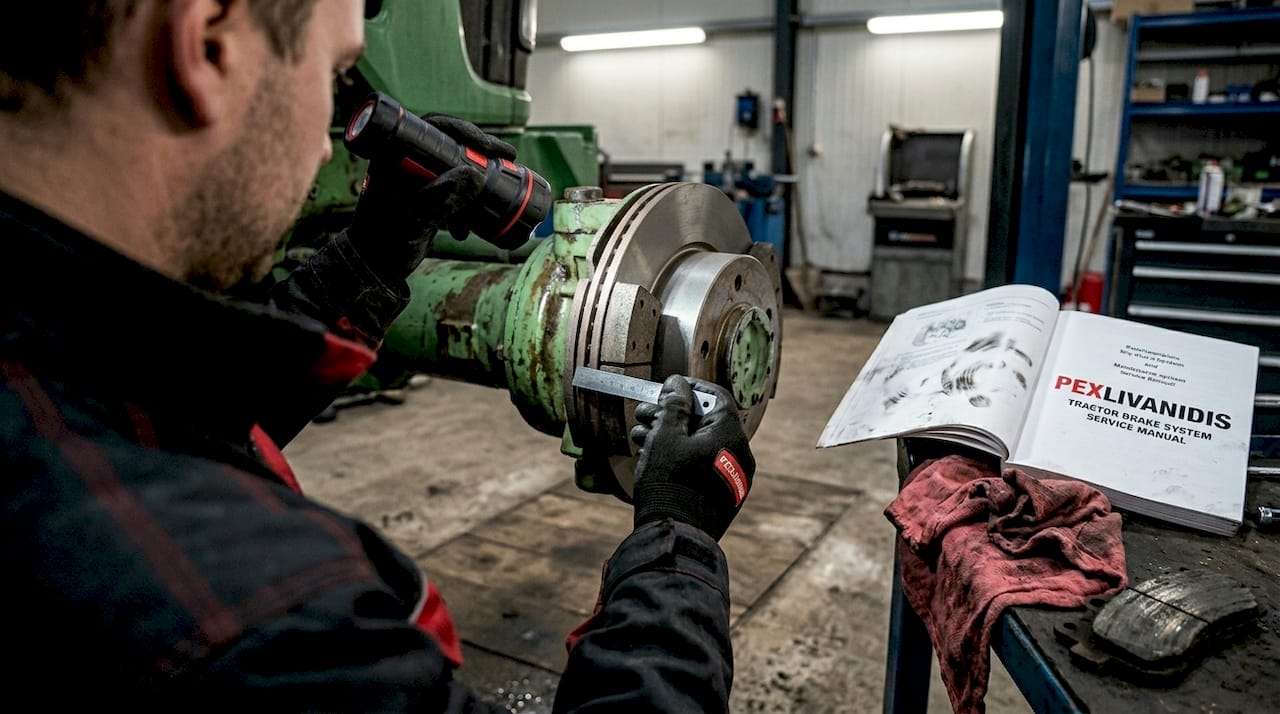
- Visual inspection of external components. Walk around the tractor and look at each wheel hub area. Check for fluid staining, dust buildup on dry disc systems, or any visible damage to the brake lines and linkage rods. Pay attention to rust around drum housings.
- Check hydraulic fluid level. Locate the brake fluid reservoir (usually near the master cylinder on the firewall or inside the cab). The level should sit between the minimum and maximum markers. Low fluid often signals a leak or worn pads. Use the correct fluid grade specified in your tractor’s manual.
- Test pedal free play. Press each brake pedal slowly by hand before engaging the engine. You should feel a short zone of resistance-free movement before the brakes engage. Brake pedal free travel should be 20 to 30mm on many compact tractor models like Kubota. Adjust via the turnbuckle if the measurement falls outside that range.
- Check linkage and adjustment hardware. Inspect the rod ends, turnbuckles, and clevis pins connecting pedals to the braking mechanism. Look for worn threads, loose pins, and corrosion. A loose clevis pin can cause sudden brake loss with no prior warning.
- Inspect for fluid leaks. With a flashlight, trace brake lines from the master cylinder to each wheel cylinder or caliper. Wet spots, mineral deposits, or rust staining along the line indicate a slow leak. Even minor leaks will worsen under field conditions.
- Measure pedal travel under load. With the engine running (in a safe, stationary position), press each pedal firmly. Measure how far it travels before you reach firm resistance. Excessive travel indicates worn linings, low fluid, or air in the system.
- Inspect brake pads or lining thickness. On dry disc systems, check pad thickness directly. Lining thickness should not fall below 6mm minimum as a general benchmark, though your manual may specify tighter tolerances.
- Check pedal interlock function. On tractors with independent left and right brakes, a mechanical interlock couples both pedals for road use. Test that the interlock engages fully and holds both pedals together. Uneven left/right brake adjustment causes pulling and swerving, especially at road speed where it becomes dangerous fast.
For a deeper look at the full maintenance workflow, step-by-step tractor maintenance covers the broader service schedule that brake inspection fits into.
“Skipping the pedal interlock check is one of the most common oversights we hear about. A farmer uses single-pedal turns all season in the field, then forgets to check the interlock before a road trip. That’s a recipe for a dangerous swerve.”
Pro Tip: Keep a simple inspection log. Write down the date, operating hours, what you checked, what you measured, and any adjustments you made. When something goes wrong later, that log tells your mechanic exactly what the baseline was and how quickly the problem developed.
Troubleshooting, maintenance intervals, and when to call a professional
After inspection, you might spot issues or wonder about how often to repeat each step. Here’s how to troubleshoot and maintain your brakes and recognize when to get help.
Common issues and what to do:
- Squeaking or squealing: Usually worn pads or contamination. Inspect pad thickness first. If pads are within spec, check for oil or grease contamination on the friction surface.
- Grinding noise: Metal-on-metal contact. Stop using the tractor immediately. This means pads or shoes are gone and damage to discs or drums is actively occurring.
- Dragging brakes: The tractor feels sluggish even when the pedal is released. Check for a seized caliper, stuck linkage, or incorrect pedal free play adjustment.
- Spongy pedal: Air in the hydraulic system. The brake lines need bleeding to restore firm pedal feel.
- Leaking fluid: Identify the leak source before adding fluid. Adding fluid to a leaking system only delays an inevitable failure.
Recommended inspection intervals vary based on how hard your tractor works:
| Use profile | Inspection interval |
|---|---|
| Light use (under 200 hours/year) | Every 100 operating hours |
| Moderate use (200-500 hours/year) | Every 50 operating hours |
| Heavy use (over 500 hours/year) | Every 25-50 operating hours |
| Any use | Before each season and after any incident |
Brake inspection frequency is benchmarked at every 50 to 500 hours depending on use intensity, with lining thickness never falling below a safe minimum. These intervals assume normal operating conditions. Dusty harvests, steep terrain, and heavy towing all accelerate wear and push you toward the shorter end of the range.
For wet disc brakes specifically, professional inspection is strongly recommended because accessing internal components requires draining axle oil and working inside sealed housings. Mechanical drum and dry disc brakes are far more accessible for a capable operator, but hydraulic systems that need bleeding or internal seal replacement are best left to a trained mechanic.
Signs that require immediate professional attention:
- Any fluid leak that has not been resolved after identification and tightening
- Pedal travel that has increased suddenly between inspections
- Brakes that lock up without full pedal pressure
- Any grinding that continues after pad replacement
For guidance on building this into a broader care routine, tractor preventative maintenance and maintenance tips for tractors both offer structured frameworks you can apply directly to your operation.
Pro Tip: Set a phone reminder linked to your operating hour meter. Every 50 hours, that reminder triggers your brake check. Farmers who rely on memory alone always find themselves realizing the check is overdue at the worst possible moment, like the start of harvest season.
Why quick brake checks aren’t enough: Lessons from the field
There’s a habit that’s deeply ingrained in Greek agricultural culture, and we see it constantly. A farmer walks up to the tractor, presses the pedal once with their foot, feels resistance, and calls it done. No measurement. No visual check. No log. Just a quick press and then off to the field.
We understand how it happens. The season is short. There are always more pressing tasks. And most of the time, that quick press works out fine. The problem is the times it doesn’t, and by then you’re already in a dangerous situation.
We’ve seen cases where the pedal felt firm right up until one side’s lining had worn completely through on one brake disc and not the other. The asymmetry only showed up during hard braking on a slope, and the result was a close call that could have ended much worse. A simple measurement of pedal free play and a visual check of pad thickness would have caught that problem weeks earlier.
The real issue is that tractor brakes fail gradually. They don’t announce themselves dramatically before the last moment. Fade, uneven wear, and slow leaks creep up over hundreds of hours of use. The farmer who relies on feel alone is essentially betting that nothing changed since last time.
Modern farm operations in Greece are increasingly mechanized, with tractors working longer hours across more challenging terrain than a generation ago. That reality demands a more systematic approach to safety checks. Building routine farm machinery checks into your weekly and monthly schedule is not bureaucratic overhead. It is practical self-defense for your equipment, your livelihood, and your safety.
The mindset shift worth making is this: a brake inspection isn’t something you do when you suspect a problem. It’s something you do regularly so that problems never reach the point of suspicion.
Upgrade your farm’s safety and efficiency with expert maintenance resources
Putting knowledge into action matters most. Here’s where to go next for deeper expertise and proven solutions.
If this guide has shown you gaps in your current brake maintenance routine, the next step is to build a structured system that covers all your equipment. At pexlivanidis.com, we carry over 20,000 spare parts for tractors and agricultural machinery, including brake components, hydraulic parts, and linkage hardware. Understanding what goes into your machine starts with knowing the agricultural machinery parts that matter most. For a complete picture of how to care for your entire fleet, our agricultural machinery maintenance guide walks you through every major system in plain, practical language. Free shipping across Greece applies to orders over 100€, and our team in Thessaloniki is ready to help you source the exact component you need.
Frequently asked questions
How often should I inspect my tractor brakes?
For most tractors, inspect brakes every 50-500 hours depending on usage intensity, and always perform a quick visual and pedal check before each day’s work.
What are signs that tractor brakes need urgent repair?
Squealing, grinding, pulling to one side, leaking fluid, or a spongy pedal all signal urgent issues. Overheating signs like a blue tint on discs or drums also indicate damage that needs immediate attention.
Can I inspect wet disc brakes myself or do I need a professional?
Wet disc brakes are complex and typically require a professional, because internal components require oil drainage and sealed housing access that goes beyond standard DIY capability.
How do I adjust brake pedal travel on most tractors?
Adjust the turnbuckle on the brake linkage rod to bring pedal free travel to 20-30mm, and always make sure the left and right pedals match each other exactly.