
TL;DR:
- Electrical issues like dead batteries and corroded connections are the leading causes of tractor failures.
- Regular inspection and preventive maintenance significantly reduce downtime and repair costs.
- Using proper tools and model-specific wiring diagrams speeds up diagnostics and ensures accurate repairs.
A tractor that won’t start at harvest time isn’t just an inconvenience. It’s lost income, missed deadlines, and a lot of frustration standing between you and your field. In Greece, where farming seasons are tight and weather windows close fast, a dead battery or a burned-out relay can cost you an entire day’s work. Most of the time, the culprit isn’t a catastrophic engine failure. It’s something electrical, something small, and something you can fix yourself if you know where to look. This guide walks you through every stage of tractor electrical repair, from understanding the system to diagnosing faults and preventing future breakdowns.
Table of Contents
- Understanding tractor electrical systems
- Tools and preparation: what you’ll need
- Step-by-step guide: diagnosing and repairing common issues
- Preventive maintenance and seasonal care
- A smarter approach: lessons learned from the field
- Get expert parts and guides for peak performance
- Frequently asked questions
Key Takeaways
| Point | Details |
|---|---|
| Know your system | Understanding the main electrical components helps you diagnose problems quickly. |
| Prepare properly | Having the right tools and safety gear prevents delays and ensures safer repairs. |
| Follow maintenance routines | Monthly checks and moisture protection significantly reduce the risk of electrical failures. |
| Act early to avoid downtime | Addressing small electrical issues promptly prevents costly breakdowns and lost working hours. |
Understanding tractor electrical systems
Before you touch a wire, you need to know what you’re working with. A tractor’s electrical system is more than just a battery and some cables. It’s a coordinated network that powers everything from the starter motor to the instrument panel.
Tractor electrical basics cover the full picture, but here’s the core: tractor electrical systems typically consist of a battery, alternator, starter, wiring harnesses, fuses, relays, and sensors in a 12V negative ground setup. That means the negative terminal of the battery connects directly to the tractor’s metal frame, which acts as the return path for all electrical current. Simple, but critical to understand before you start probing.
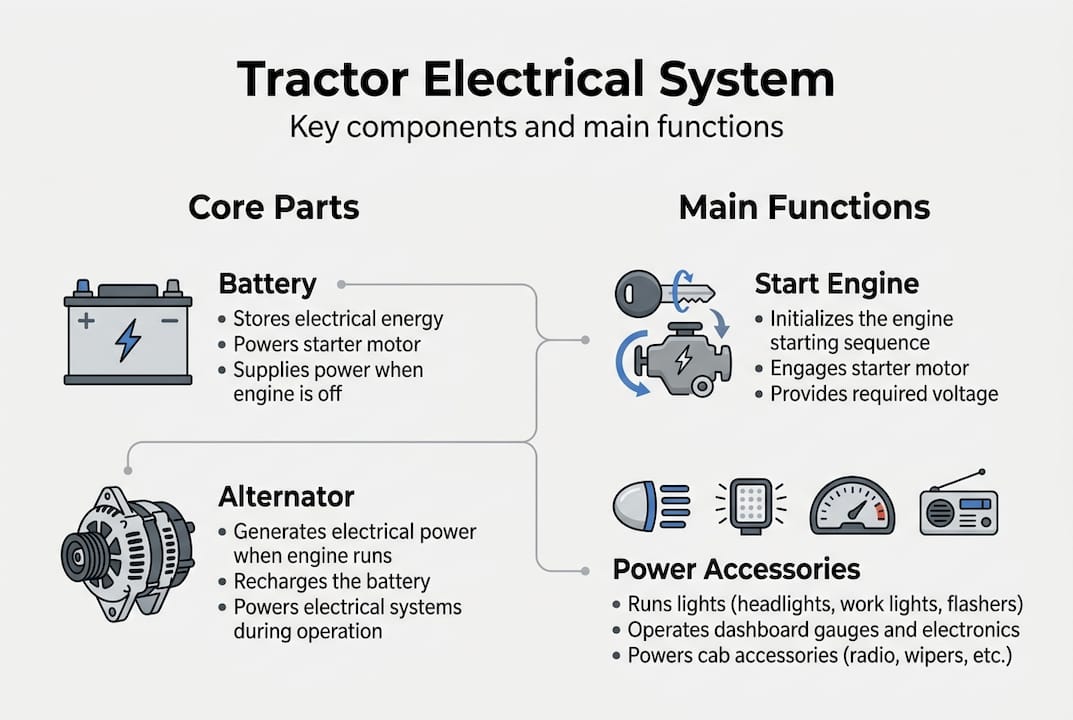
Here’s a quick breakdown of each major component and its role:
| Component | Function |
|---|---|
| Battery | Stores and delivers power to start the engine and run accessories |
| Alternator | Recharges the battery while the engine runs |
| Starter motor | Cranks the engine when you turn the key |
| Wiring harness | Routes electrical current between all components |
| Fuses | Protect circuits from overload by breaking the connection |
| Relays | Switch high-current circuits using low-current signals |
| Sensors | Monitor engine parameters and send data to the ECU or gauges |
Knowing these roles helps you trace problems logically instead of guessing. When your tractor cranks slowly, that points to the battery or starter. When accessories stop working, fuses and relays are usually the first suspects.
Common signs of electrical trouble include:
- Engine won’t crank or cranks weakly
- Warning lights staying on or flickering
- Accessories (lights, PTO controls) not responding
- Burning smell near the dashboard or wiring
- Visible corrosion on battery terminals or connectors
For model-specific wiring layouts, always consult official wiring diagrams for your tractor brand. Generic guides only get you so far. The actual circuit paths vary significantly between a 1990s Massey Ferguson and a modern John Deere.
Tools and preparation: what you’ll need
With component knowledge in hand, it’s crucial to gather the right tools and prepare your workspace before starting any repairs. Jumping in without the right equipment wastes time and can make problems worse.
Here’s what every operator should have on hand:
Essential tools:
- Digital multimeter (for voltage, resistance, and continuity tests)
- Set of wrenches and socket drivers
- Flathead and Phillips screwdrivers
- Wire stripper and crimping tool
- Wire brush for terminal cleaning
- Electrical tape and heat-shrink tubing
Safety equipment:
- Insulated gloves
- Safety goggles
- Insulated screwdrivers
Consumables:
- Dielectric grease
- Replacement fuses (assorted ratings)
- Spare wire and connectors
- Terminal cleaner spray
A comparison of repair approaches shows why preparation matters:
| Approach | Time to diagnose | Risk of error | Cost |
|---|---|---|---|
| Prepared with tools and diagram | 30-60 minutes | Low | Low |
| No diagram, basic tools | 2-4 hours | High | Medium |
| Guesswork, no tools | Half day or more | Very high | High |
Always disconnect the negative battery terminal before working on any circuit. Work in a dry, well-ventilated space. Moisture and electrical repairs don’t mix, especially during the damp Greek winter months.
Safety first: Never work on tractor wiring with the engine running or the key in the ignition. A short circuit during a repair can damage the ECU, which is an expensive mistake.
Official manuals for New Holland, Kubota, John Deere, and Massey Ferguson provide model-specific wiring diagrams and procedures. Before reviewing system components, locate your manual or download the correct diagram for your machine.
Pro Tip: Store a laminated copy of your tractor’s wiring diagram in the cab. When something fails mid-season, you won’t have time to search online. Having it within reach cuts diagnostic time in half.
For sourcing quality replacement parts locally, following preventative maintenance steps before problems arise means you’ll already know which spares to keep stocked.
Step-by-step guide: diagnosing and repairing common issues
Now with tools and safety set, you’re ready to tackle real-world tractor electrical issues step by step. Work through these in order. Skipping steps leads to misdiagnosis.
- Disconnect the negative battery terminal before inspecting any wiring or components.
- Inspect the battery first. Check terminal voltage with your multimeter. A healthy 12V battery should read 12.6V or higher at rest. Below 12V means it needs charging or replacement.
- Test the alternator output. Start the engine (if possible) and measure voltage at the battery terminals. You should see 13.8V to 14.4V. Anything outside that range points to an alternator fault.
- Check fuses and relays. Pull each fuse and inspect it visually. Use your multimeter in continuity mode to confirm. Swap relays with identical spares to test quickly.
- Trace the wiring harness. Look for cracked insulation, pinched wires, or corroded connectors. Pay close attention to areas near the engine block where heat causes the most wear.
- Clean all ground points. A poor ground connection causes more mysterious electrical faults than almost anything else. Remove, clean with a wire brush, and reconnect every ground bolt.
- Reconnect the battery and retest. After repairs, reconnect the negative terminal and test the system. Confirm all accessories function correctly before returning the tractor to service.
For a broader look at fixing electrical problems across multiple tractor systems, or for understanding tractor faults that go beyond wiring, those resources add useful context.
Corrosion is especially common in Greece’s coastal and winter-wet regions. When moisture gets into a connector, it creates resistance that mimics a broken wire. Clean connectors with terminal spray and seal them with dielectric grease after every repair.
Pro Tip: Label every wire you disconnect with masking tape and a marker before removal. Reassembly becomes much faster and error-free.
Routine preventive maintenance reduces electrical failures by 70%, which means most of the breakdowns you’ll face in the field are entirely preventable with consistent attention.
Preventive maintenance and seasonal care
Repairing issues is vital, but ongoing prevention is the key to true reliability and long tractor life. The goal is to catch problems before they stop you in the middle of a job.
Build these habits into your regular schedule:
- Monthly: Inspect all visible wiring for fraying, cracking, or chafing. Check battery terminals for corrosion. Tighten any loose connectors.
- Before each wet season: Test battery capacity with a load tester, not just a voltage check. Apply fresh dielectric grease to all exposed connectors.
- After heavy use: Inspect the wiring harness near the engine and exhaust for heat damage. Check ground straps for looseness.
- Annually: Replace any fuse that shows discoloration, even if it hasn’t blown yet. Inspect the alternator belt for wear.
For Greek operators, winter moisture is the single biggest threat to electrical reliability. Rain, fog, and condensation work their way into connectors and corrode contacts silently over weeks. You won’t notice the damage until something stops working at the worst possible moment.
According to seasonal tractor care data, routine maintenance reduces electrical failures by 70% and cuts overall downtime by 40%. Those aren’t small numbers. For a farmer running a tight seasonal schedule, that difference is measurable in harvested crops.
Pro Tip: Keep a simple logbook in your cab. Write down every inspection date, what you checked, and any parts replaced. When something does fail, that record helps you trace the cause faster and proves maintenance history if warranty questions arise.
For deeper guidance, the maintenance tips and repair best practices resources cover scheduling and component-specific care in more detail. Protecting wiring from moisture and dust is a year-round job, not just a winter task.
A smarter approach: lessons learned from the field
Here’s something most repair guides won’t tell you: the majority of tractor breakdowns that get blamed on “engine problems” or “mechanical failures” actually start with neglected electrical systems. A corroded ground strap causes the starter to draw excess current. That stresses the battery. The battery fails. The farmer calls a mechanic, who replaces the battery, but the corroded ground is still there. The cycle repeats.
In Greece specifically, the combination of winter moisture, dusty summer conditions, and older tractor fleets makes electrical neglect more costly than in many other regions. Mechanical components are built to tolerate rough conditions. Electrical connections are not.
Operators who invest 20 minutes a month in visual checks and basic cleaning reclaim hours of downtime per season. They also spend less on emergency repairs because they catch faults before they cascade. Learning to use a multimeter and read a wiring diagram isn’t a specialist skill. It’s a practical tool that pays for itself the first time you avoid a field breakdown.
Building that confidence is what long-term tractor reliability is really about. Self-reliance in the field isn’t just satisfying. It’s a direct reduction in operating costs.
Get expert parts and guides for peak performance
Ready to put these strategies into action? At Pexlivanidis, we stock over 20,000 agricultural machinery parts for tractors of all major brands, including the electrical components most likely to need replacement: batteries, fuses, relays, connectors, and wiring accessories. Orders over 100€ ship free across Greece. Whether you’re a solo operator in Kavala or managing a larger fleet near Thessaloniki, you’ll find the parts and the guidance you need. Browse our full maintenance tips guide for more practical resources, or contact our team directly for help identifying the right part for your specific tractor model.
Frequently asked questions
What are the most common tractor electrical problems?
The most common electrical issues are dead or weak batteries, corroded connectors, blown fuses, and faulty wiring harnesses. These account for the large majority of field failures and are all diagnosable with basic tools.
How often should tractor electrical systems be inspected?
Monthly visual checks are recommended, with additional inspections before high-moisture seasons. In Greece, winter moisture protection is critical and consistent checks reduce failures by 70%.
What tools are essential for tractor electrical repairs?
You’ll need a multimeter, basic hand tools, insulated gloves, dielectric grease, and your model’s wiring diagram from the official repair manual. These cover the vast majority of common repair scenarios.
How can I protect tractor electrical systems during Greek winters?
Clean and tighten all connectors, apply dielectric grease, and shield wiring from moisture before the wet season begins. Preventive maintenance cuts downtime by 40% and keeps your tractor ready when you need it most.